

Yes, you read it correctly. You can travel in time on your data using Azure Data Bricks and DeltaLake. The feature is quite easy to use and comes with a lot of very nice features and business value. Even a value so powerfull that the business does not need to make descissions up front when you are building your data warehouse.
A little word about the background
Azure has abopted DataBricks into the Azure Synapse portfolio with seemless integration between all the services from within the umbrella of Azure Synapse.
Notebooks directly in Synapse can do a lot of the stuff from DataBricks and are almost on par with the features between the two. But on some areas the DataBricks engine is more powerful than the build in Notebooks in Synapse.
The reason, at least some of it, is that Microsoft needs to do some rewriting of the features to fit into the services between the Blob Storage and the Notebooks. Some of these things are also a part of the close collaboration between Microsoft and DataBricks, and Microsoft does not want to out-smart DataBricks on everything.
If you would like to learn more about the cooperation between DataBricks and Microsoft - you can read this external link
Lets code
The followind code blocks are creating a dataframe to work with. I’ll go through the steps below the picture.
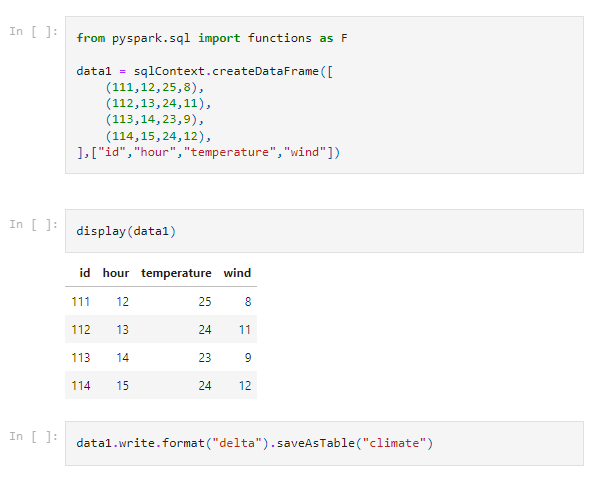
The first section is importing the functions library from pyspark.sql - we need that to create the dataframe in a SQL context.
Then I’m creating some dummy data in a dataframe named data1. It looks just like a CTE on SQL and the syntax is also very much like so.
In the next section I’m displaying the dataframe to test if the data looks right.
The last section writes this dataframe to a delta-table with the name of “climate”.

Above section is investigating the table “climate” by a nifty %sql language change and then executing the DESCRIBE function on the table.
This gives an output as below:
subset of the table
| version | timestamp | userName | operation | operationParameters |
|---|---|---|---|---|
| 0 | date T15:56:09.000+0000 | username | CREATE TABLE AS SELECT | Map(isManaged -> true, description -> null, partitionBy -> [], properties -> {}) |
From the column OPERATION we can read that the table has been created and from the TIMESTAMP and USERNAME we can read the info on when and who.
The important part here, is to know that the VERSION starts with 0 (zero).
Then I’m adding another two rows to the dataset by executing the below sections.
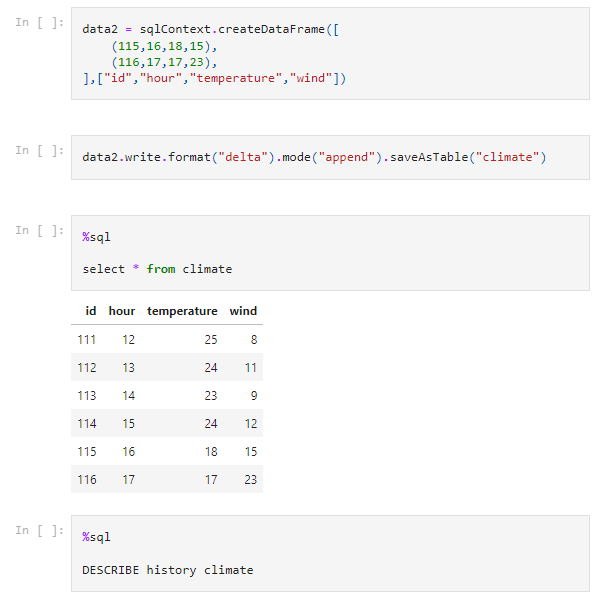
The first section is creating a new dataframe with the name of data2 and adding the two rows of data.
The next section is adding (the append statement) data to the existing table “climate”.
Again I’m accessing the data to see if everything is ok, now with 6 rows of data.
The last section is a describe again - and now we see that the meta-data and history of the table has been updated.
subset of the table
| version | timestamp | userName | operation | operationParameters |
|---|---|---|---|---|
| 1 | date T15:57:35.000+0000 | username | WRITE | Map(mode -> Append, partitionBy -> []) |
| 0 | date T15:56:09.000+0000 | username | CREATE TABLE AS SELECT | Map(isManaged -> true, description -> null, partitionBy -> [], properties -> {}) |
We see that the new entry with VERSION = 1, now has an OPERATION of WRITE and the OPERATION METRICS shows us two file (which in this example is equal to the added rows).
The timetravel
Now to the fun part. We can do timetravel on the created dataset.
With below statement get the data as it looked like in VERSION 0:
|
|
| id | hour | temperature | wind |
|---|---|---|---|
| 111 | 12 | 25 | 8 |
| 112 | 13 | 24 | 11 |
| 113 | 14 | 23 | 9 |
| 114 | 15 | 24 | 12 |
And below gives me the data as it looks after VERSION 1 has been implemented (the total dataset)
|
|
| id | hour | temperature | wind |
|---|---|---|---|
| 111 | 12 | 25 | 8 |
| 112 | 13 | 24 | 11 |
| 113 | 14 | 23 | 9 |
| 114 | 15 | 24 | 12 |
| 115 | 16 | 18 | 15 |
| 116 | 17 | 17 | 23 |
If I want to achieve the same in clean python I can execute below statement:
|
|
I can also do the same with timestamps to get data from a specific time using below statement:
|
|
Try it out yourself
I’ve made a small demo script of the above excamples which you can find from my GitHub public repo here and try out on your own.
If you would like to read more about the feature and the syntax to use it - you can refer to below external links:

Subscribe to my channel
")
")
Free Microsoft Workshops
![]()
- Fabric Analyst
- Power BI dashboard
- Real-Time Intelligence